Wednesday, May 30, 2012

Kitchen Remodel Part 1

We have lived in our house since my son was about 4 months old. He turned 9 this year. With our family growing from 4 to now 6, it has become a bit cramped. Trying to be frugal, we have chosen to stay in our lovely smallish house. Part of the sacrifices of being a stay-at-home- mommy I guess. We painted our living room and kitchen right when we moved in. The kitchen was a nice sunny yellow and the living room and beachy blue. But I have become bored of my kitchen. I spend the majority of my time in my kitchen and I wanted something that made me smile, something brighter and more fun. So with the help from good ol' Pinterest, I got some lovely ideas in my head and put them to the test.
Here is the kitchen before:


Here is what it looked like before. Excuse the cluttered and half-naked kids, just  keeping it real for ya! The walls were a pale yellow and in need of at least a touch up. We had been given the hutch from my mother. I really don't prefer dark wood, but free furniture is free furniture, right? I had a bunch of pieces of white dishes but the were not showcased right there. It also became my drop spot for anything and everything. Since we had the hutch in the corner we didn't have any room for table so it was out in the open. Behind the table you can get a glimpse of the white table from Target that we had the printer on, that will show up in the re-do. The curtains were faded and the brackets were coming off the walls from where the kids twist up in the curtains. I loved my clipboards one for each kids ( I made them before I had 4 kids) and one for chores and school. But they made that wall cluttered. I had hooks below where the kids hung there school bags and lunch boxes, and sweatshirts and coats sometimes. That was just cluttering up my kitchen too much though.
 Another angle (from the doorway you see int he last picture)
Pretty much the standard grade cabinets, nothing fancy.  I have very limiteed counter space and that big microwave takes a good portion of that (still no remedy to that). For the size kitchen we have, there are actually very few cabinets. We put a cheapo cabinet in there and kept cereal and such in it. I had kids artwork on it at one point and you can see where the tape pulled the finish off.

I really didn't get a good shot of this wall. And yes, keeping it real for you for my before shot. That mess is what that poor piece of furniture had to live with. Awhile back we had a chest freexer there, but i didn't use it much because it always got piled with stuff and I couldn't ever open it to get into it. I hated the weird waste of space below the cabinet, it never made sense to me. The fridge is to the right and after that more wasted wall space where we had the "pantry"

Here is some shots of that wall and the pantry. I made a  chalkboard for each of the kids which was fun and cute, but you can see one fell down and is missing from this shot.


Here is a close up of my cabinets. Yes they are dirty and the one above is broken. The one below shows the lovely floral knobs, which were in a weird spot on the door, especially for a short gal :)

And below is a close up of my fuse box, huge and in your face. We painted it like to wall to help it blend in.


So there you have it my very real, lived in, cluttered kitchen. Stay tuned for the afters!!


Tuesday, May 29, 2012

Blog Revamp

It has been a long time since I have used my blog. I am hoping to start posting regularly with post/pictures of projects that I work on. So we will see if my ADD can be thwarted enough to keep this going! lol!Wish me luck!

Tuesday, November 23, 2010

Christmas is coming!!!

I LOVE Christmas! I know, most people can say that. But it just makes me feel all young and like a kid again. I think most of the fun is the anticipation of it. There are all the traditions that lead up to the big day. Like, putting up the Christmas tree on Black Friday, fun little crafts with the kids, making Christmas cookies, gingerbread houses, Christmas music on everytime you get in the car. I LOVE it ALL.

One thing I love is Christmas Cards. I love to recieve them. I enjoy seeing the people that I love and what they have to say. It is a time to help remember some of my favorite people. Every year I always worry about what kind of card I will send out. Do I do a newsletter? How about a picture? I even used to worry about making them, but no longer. The way I have decided to go is photo Christmas Cards. I love my family and pictures of them, So i figure, combine them and share them with the ones I love. I have found some GREAT ones this year at shutterfly.com.

That is all the motivation I needed to get some photos done. My good friend Erika with Lassen Photos took our family pictures and did a terrific job. So now the tough part, picking a card to put our family picture on! Shutterfly has so many amazing choices for Christmas photo cards!

This is one of the first ones I saw and LOVED it, perfect if I can't decide on just one picture
(I love the whole intial thing!)


here is another collage one, with a GREAT title! ( I love that song!)this saying totally fits me, I love all of my blessings!I like to add a reminder of the reason why we celebrate this wonderous holiday. This one does it simply, yet beautifully and would showcase a picture just right!

and if you have something more to say, this one is perfect, your newsletter
AND your card in one punch!

And this one, simple, yet perfect to showcase that great shot of your loved ones!


With Shutterfly you can get your Christmas cards AND and little bit of shopping in as well. Now since I have all these beautiful pictures of my family, with a few clicks I can have a beautiful calendar for a gift (I am thinking this will be under the tree with MY name on it :)


or how about theses mugs, everyone can use a mug, right?


Since I have ordered from Shutterfly before and have been very pleased with their products, I know that what I get will be great!
So, wait by your mailbox to see what card I chose! ( I know you will ;)
Also, I'd LOVE to get one of your Christmas cards!!!
Merry Christmas!!!

*all photos are from Shutterfly.com

Wednesday, September 22, 2010

Handmade Holidays


We are again having a crafty activity for the month of october for RS.

Sat Oct 9th 10-12

Here are the crafts that will be available.
(sign ups will be due OCT 1st!)

10 am classes:


Temple Board: ($1)

paint and decopauge a temple picture onto a wooden block.
DC temple will be used with either
"I'm Going there Someday" or "Families are Forever"
(If you would like a different temple, please see Laura Denning)


(similar to picture)
Fabric Flower: (free)

a simple fabric flower. can attach to a hair clip or use to embellish something.


Sock Snowman (free)

a cute holiday decoration, made with a sock!
Countdown Blocks ($5)

a pair of blocks, painted and decorated used to countdown until Christmas.
(they can be used for birthdays or Halloween, just bring your own


11 am classes

(sorry no picture available)

Slipcovered ribbon headband ($1)

we will be making ribbon "slipcovers" to fit a plastic headband. Many looks with only one headband!

Baby Name Plaque (free- bring own 5x7 frame)

Baby's name, birthdate, place of birth and parent's names,
sandwiched in with the words to "I am a Child of God"


Magnet Stand ($5)
These hold a 6x8 piece of metal which uses magnets to hold up pictures.Base says "together forever"

(If you would like a different 1-2 word phrase- see Laura Denning )

Saturday, February 6, 2010

Finished dresses with fabric flowers

I finially finished all 3 dresses that I wanted to make for the girls.

The older girls dresses are t-shirts that were cut, then I made the "dress" part and sewed that to them. For each dress I did different flowers on there.
For the "rose" one I took a length of fabric (forget how long) by 3inches wide. I sewed it together and then gathered the long edge. I then sewed that to the front of the shirt. Here is the one I made for my oldest. Go here for instructions on how to make that flower.


Here is the one I made for the baby. I pretty much followed the tutorial I linked down below.
For the flower I followed this tutorial for hair pins at Polka Dot Pineapple.


I am not sure which flower is my favorite, hmmmm.
Now on to the next project though I think I may make some more of these.

Wednesday, February 3, 2010

fabric flower

Here is the fabric flower that I used on my oldest daughter's dress down below. I also made a bunch and attached them to clips to use as barrettes. Here is how I did it:

I cut the fabric into squares. I started at 3.5 inches and went down a half of inch from there. ie. 3 inches then 2.5...

fold your square in half


in half again


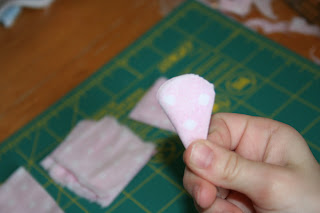
into a triangle-


round off that corner


now you have an ice cream cone shape, mmmm.


open up and you have a flower shape!


sew around the edge of the flower.

(This part is a pain in the butt)

Then stack them and sew a button all the way securing them together.


After I attached it to the dress I realized that the big one flopped down so I had to tack the top petal.


Monday, February 1, 2010

Challenge update...

I finished one dress! This one was for my middle daughter. I used an old t-shirt and cut it instead of a onesie. I included a ruffle, but it was the same fabric. Looks super comfy. Will post more of what I did later. I also made a dress for my oldest, but haven't taken a picture of it yet but... her flowers are like this...
Will post how I made these- along with matching bows tomorrow hopefully. Depends on how fussy the baby is!

I haven't made one for the youngest yet because I realized I don't have a solid color onesie to use. So I will have to cheat and buy some onesies but I can use some anyway.